Unless you live under a rock, you may have heard of how lots of people are leaving Twitter for Mastodon or are at least starting to use this alternative platform, following changes that new Twitter owner Elon Musk is already making to Twitter leaving many people unhappy. Many news outlets are reporting about this, and most public Mastodon instances are currently experiencing load issues and slowness due to the large number of new users.
I'll leave it to the Wikipedia article I linked above to explain what Mastodon is and how it works in detail. The TL;DR version is that Mastodon is an open source, decentralized social network. "Decentralized" simply means that there is no single server or system owned by a single corporation or individual; instead, it's a federation of lots of servers or "instances" around the world that allow users on different instances to follow each other and exchange content, just like on Twitter. This way there is no single "owner", and each instance has one or more admins that decide how to moderate content or which other instances to block (for example, some admins may not want their instances to communicate with other instances that spread hate, racism and other no-no topics). There are no ads either, which is a plus.
Most people new to Mastodon just create an account on public instances, and you can find instances focussed on some specific topics.
Personally, I first created an account with the hachyderm.io instance run by Kris Nova, but then I decided that since I was just getting started, I might as well set up my own instance already and be in full control, because why not 😀
This post will describe how I set up my instance from start to end. Some of the choices I have made offer some flexibility, for example you can use another service to send emails or store media if you don't want to use the same services that I use.
Prerequisites
Domain name
For my instance I use the domain botta.social, which I purchased just for this. You can either use an existing domain if you have one, or buy one for this purpose; regardless of which domain you use and where you buy it from, I highly recommend you use Cloudflare for the DNS for two reasons: it can protect your instance from DDoS attacks even with the free plan, and it can easily be used as CDN in front of your storage bucket, which is recommended with some object storage services like Wasabi, which is what I use.
So the first step I recommend is to configure Cloudflare with your domain. If you purchase your domain directly with Cloudflare (which is also a registrar) then this is done automatically for you. If not, you can add a site to your Cloudflare account specifying the domain and follow the simple instructions. It takes just a few minutes.
Object storage
You can use most S3 compatible services but I recommend Wasabi, since it's cheap and has a good coverage of the S3 API spec. I tried R2 by Cloudflare and it didn't work because it doesn't support the full API yet, while Backblaze B2 works but is a lot slower than Wasabi.
If you go with my recommendation and use Wasabi, create an account and a set of access/secret keys, then create a bucket with the same name as the domain name you want to use with the CDN - which is Cloudflare in our case - in a location close to your server (for me Frankfurt since my server is in Nuremberg). So for my botta.social Mastodon instance, I created a bucket named files.botta.social. It is possible to serve files directly from Wasabi, but due to their policy regarding the bandwidth I recommend you use Cloudflare in front of the bucket to cache the assets and save on bandwidth used by Wasabi.
Once you create the bucket, go to the bucket's setting and edit the policy as follows:
Of course, change the name of the bucket with yours. This policy makes it possible to serve the files out of the bucket with permanent public URLs, instead of pre-signed URLs that expire after a certain amount of time.
Now go to Cloudflare, and create a CNAME record with the same name as your bucket and pointing to the correct Wasabi endpoint hostname depending on the location/region of the bucket - you can see the list here.
With these changes, your Mastodon assets will be served and cached by Cloudflare under your subdomain, instead of being served by Wasabi.
SMTP relay
Another service I recommend you use is an SMTP relay. When later we run the Mastodon's setup task, it will ask whether you want to send emails from localhost or not. You could set up something like Postfix and just send emails directly from your instance, but you may run into deliverability issues due to the reputation of your instance's IP etc. So it's recommended that you use a third party provider to deliver your emails. There are a lot of such services, but the one I use and recommend is Zepto by Zoho, since it's super cheap and Zoho has a long experience running email services. I'm not gonna go into the details of how to configure your domain for email sending because it depends on the provider and requires some understanding of the DNS settings involved, DKIM keys, SPF etc. I can try to help if you run into issues with this and ask for help in the comments.
Creating the server
For your instance you can use any kind of server from any provider, really, provided that it has enough resources. In my case I use a cloud server from Hetzner with 2 cores and 8GB of RAM, which costs me around 12 euros per month. I recommend more than 4GB of RAM, since I tried with that amount and it was not enough for me. I recommend Hetzner if you don't already have a provider of choice since it offers reliable and performant servers for a fraction of the price of other providers. Hetzner has locations in the US, Germany and Finland at the moment.
If you go with Hetzner, you can follow the instructions below, otherwise it depends on the provider you use. One advantage of using Hetzner Cloud over other providers is that it offers a firewall feature in front of your server, and that's recommended vs configuring a software firewall inside the server because that way malicious traffic is blocked before even reaching your server at all.
First things first, create an account with Hetzner Cloud if you don't have one already. Then create a project from the console with a name like "Mastodon" or whatever you like, and add your public SSH key under Security -> SSH Keys from the sidebar. You will then be able to configure your server so that it already has this key, letting you SSH into the server easily.
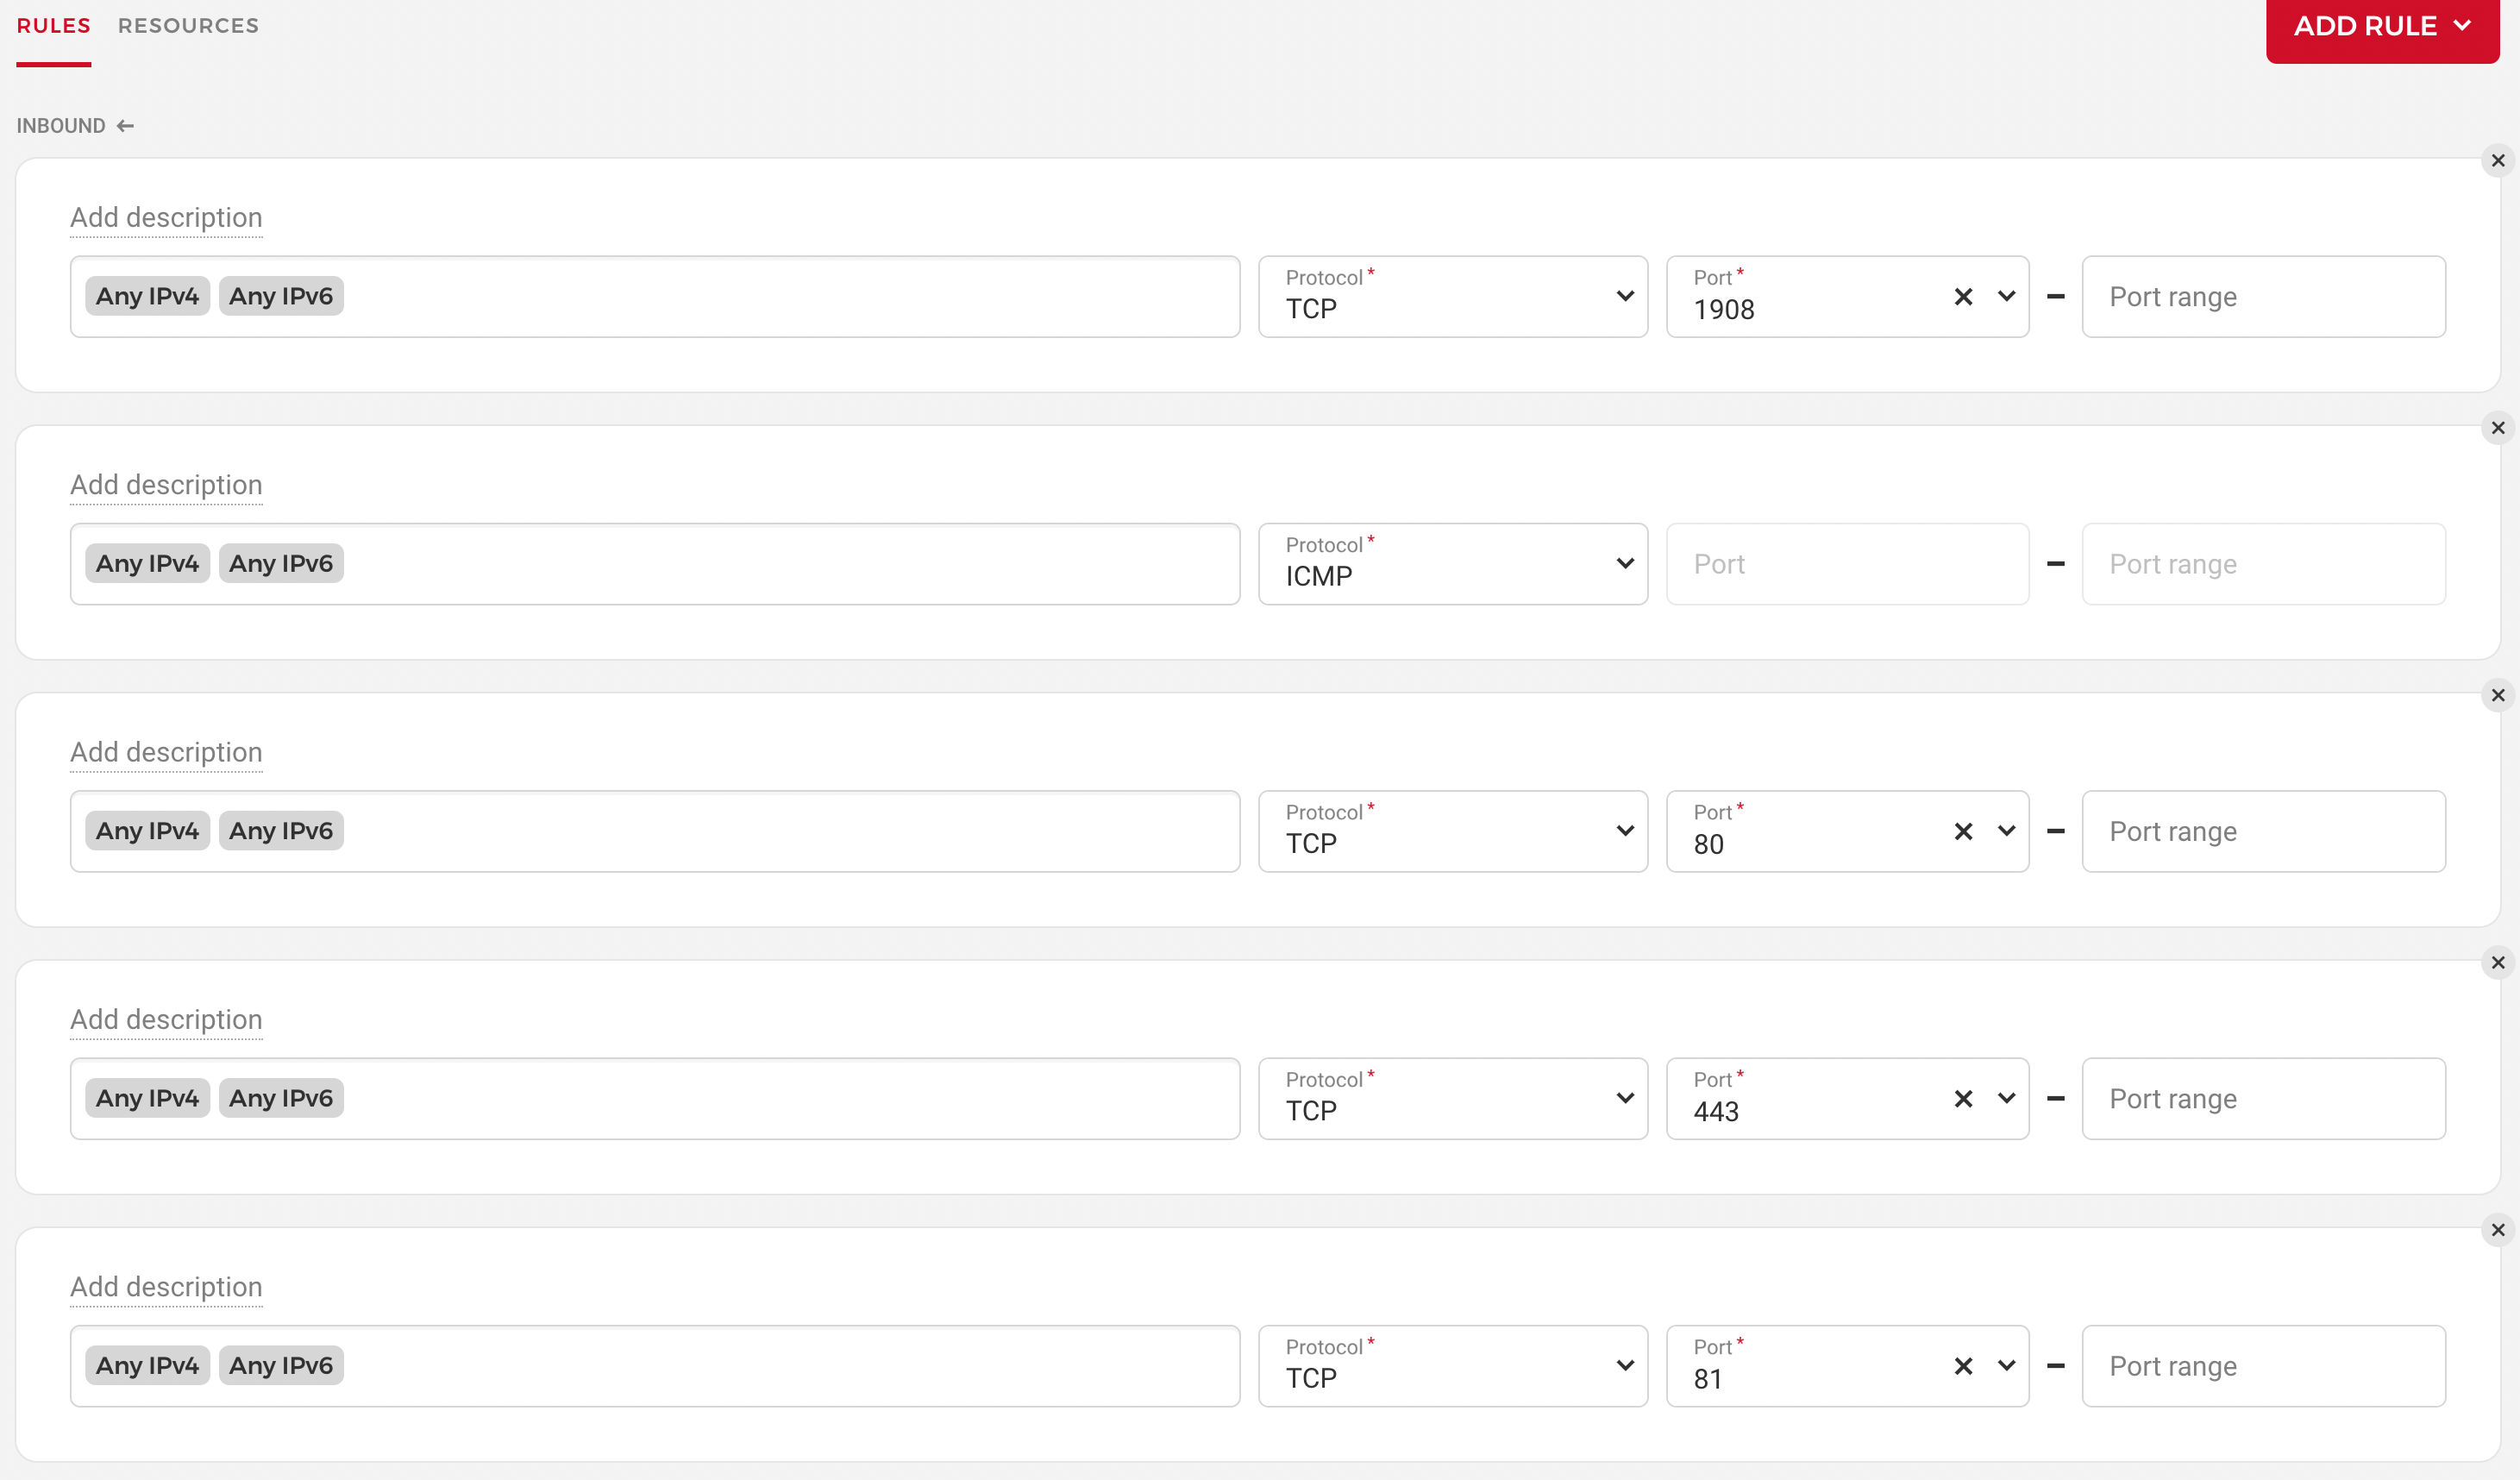
Next, head to Firewalls, and create a new firewall like in the picture:
So you basically want outbound rules that allow traffic from any IP address to ports 1908, 80, 443, 81 and ICMP pings. Ports 80 and 443 are for regular traffic, 81 is for the Nginx Proxy Manager admin panel which we'll set up later, and 1908 is the port I use for SSH. This is one port that you can change with whatever you like, as long as it's different from the default port 22 to block most scripted attacks against SSH.
Now go to Servers, and click on Add Server. Here you can choose the location that you prefer (my instance is in Nuremberg since I am based in Finland, Europe, and Nuremberg has good latency also for US users). For the image I recommend Ubuntu 22.04 if you want to follow my instructions to the letter. For the instance type I recommend an instance with more than 4GB of RAM; I chose the CX31 with 2 cores and 8GB of RAM; instances with shared cores are good enough. The ones with dedicated cores may offer improved performance but they are quite a bit more expensive.
Under Networking you can leave the default settings. Under SSH Keys select the key you added earlier, and under Firewalls selected the firewall you also created earlier. Also I recommend you enable backups. Give a name to the server and click on Create and buy now.
Hetzner is pretty quick at provisioning cloud servers, they are typically ready in 10-20 seconds. Once the server is ready, take note of its public ipv4 address, then go to Cloudflare's DNS settings for your domain, and configure an A record pointing to that IP. Make sure you configure the domain or subdomain you want to use for your Mastodon web app, like botta.social in my case.
Preparing the server
Before setting up Mastodon, we need to prepare the server with a few things. Firstly, we want to create a new user for SSH connections and disable both password authentication and authentication with the root user altogether:
adduser vito
usermod -aG sudo vito
In the example above, I have created a user named vito and added it to the sudo group. Of course name your user as you please. I am not entirely sure if this is still needed, but I also added the following line to /etc/sudoers:
vito ALL=(ALL) NOPASSWD:ALL
Maybe it's no longer needed if you add the user to the sudo group so you may just want to double check. It doesn't hurt anyway.
Now you need to copy your public SSH key to this new user:
Next, edit /etc/ssh/sshd_config and edit as follows:
ClientAliveInterval 300
ClientAliveCountMax 1
PermitRootLogin no
PasswordAuthentication no
Port 1908
MaxAuthTries 2
AllowTcpForwarding no
X11Forwarding no
AllowAgentForwarding no
AllowUsers vito
For Port you can use a port other than 1908 (which I use) if you prefer; for AllowUsers make sure you specify only the name of the user you created earlier.
Test the config:
sudo sshd -t
If all looks good, restart the SSH server to apply these changes:
sudo systemctl restart sshd
Next, I recommend you install Fail2ban, which can ban IPs originating some bruteforce attacks against SSH. This is not critical if you use a non standard port for SSH and disable password authentication like we did, but it's anyway good to have:
In order to be able to run Docker commands with your non-root user, log out and log in again, then test with:
docker ps
If you don't get any errors, proceed with creating a network that we'll use to link the Mastodon containers with the Nginx Proxy Manager one:
docker network create apps
Setting up Mastodon
Now that the server is ready, we can proceed with the meat of the post. As I mentioned, we are going to run Mastodon as containers since it's a lot easier than the alternatives. For this, we need to create a couple of Docker compose files. Create a directory that will contain these files somewhere, and create the following structure inside it:
This compose file describes all the Mastodon components; you need to edit the paths for the env_file setting to replace vito with your username. Same thing for the paths in volumes. For the streaming container also change the VIRTUAL_HOST domain with yours.
Then start a psql shell with the postgres container:
psql -h 127.0.0.1 -P 5432 -U postgres
and create the mastodon database:
CREATE DATABASE mastodon;
Then press ctrl-D to exit the shell.
Run the following command to generate the Mastodon configuration:
docker compose -f compose/mastodon/docker-compose.yml \
run --rm -v /home/vito/compose/mastodon/.env:/opt/mastodon/.env.production \
-e RUBYOPT=-W0 web bundle exec rake mastodon:setup
This command will ask you a number of questions including which domain you want to use, the name of the database, your object storage and email delivery settings and more; don't rush, accept the defaults when you don't have an answer for things I haven't covered, and make sure you read them and answer them properly according to the information you should have by now. You will also be asked if you want to create a single-user instance; I recommend you answer no and disable signups later, for flexibility. You will also be able to create your first account, the admin account. Make sure you say yes to saving the configuration, and this will fill in the file mastodon/.env with this configuration. Then append the following lines to enable full text search with Elastic Search:
And check the logs for each container, ignoring Nginx for now. You can see which containers are running with the command
docker ps
and then check the logs for a container with the command
docker logs -f mastodon-web # or name of other container
At this point, all the Mastodon containers should start correctly. If you run into issues with this, let me know in the comments.
To create the indices for Elastic Search, first exec into the web container:
docker exec -it mastodon-web bash
Then from inside the container run:
RAILS_ENV=production bin/tootctl search deploy
Setting up Nginx
The last bit remaining to be able to access Mastodon from your custom domain, is to set up the Nginx Proxy Manager.
First, install the MariaDB client:
sudo apt install mariadb-client
Then open a shell:
mysql -uroot -p<your mariadb password> -h 127.0.0.1
and create a database for Nginx:
CREATE DATABASE nginx;
Now restart the Nginx container:
docker restart nginx
Check the logs and once it's started, open the URL http://<server IP>:81. This will show you the Nginx Proxy Manager admin panel. Log in with username: [email protected] and password: changeme, then be sure to change username and password right away.
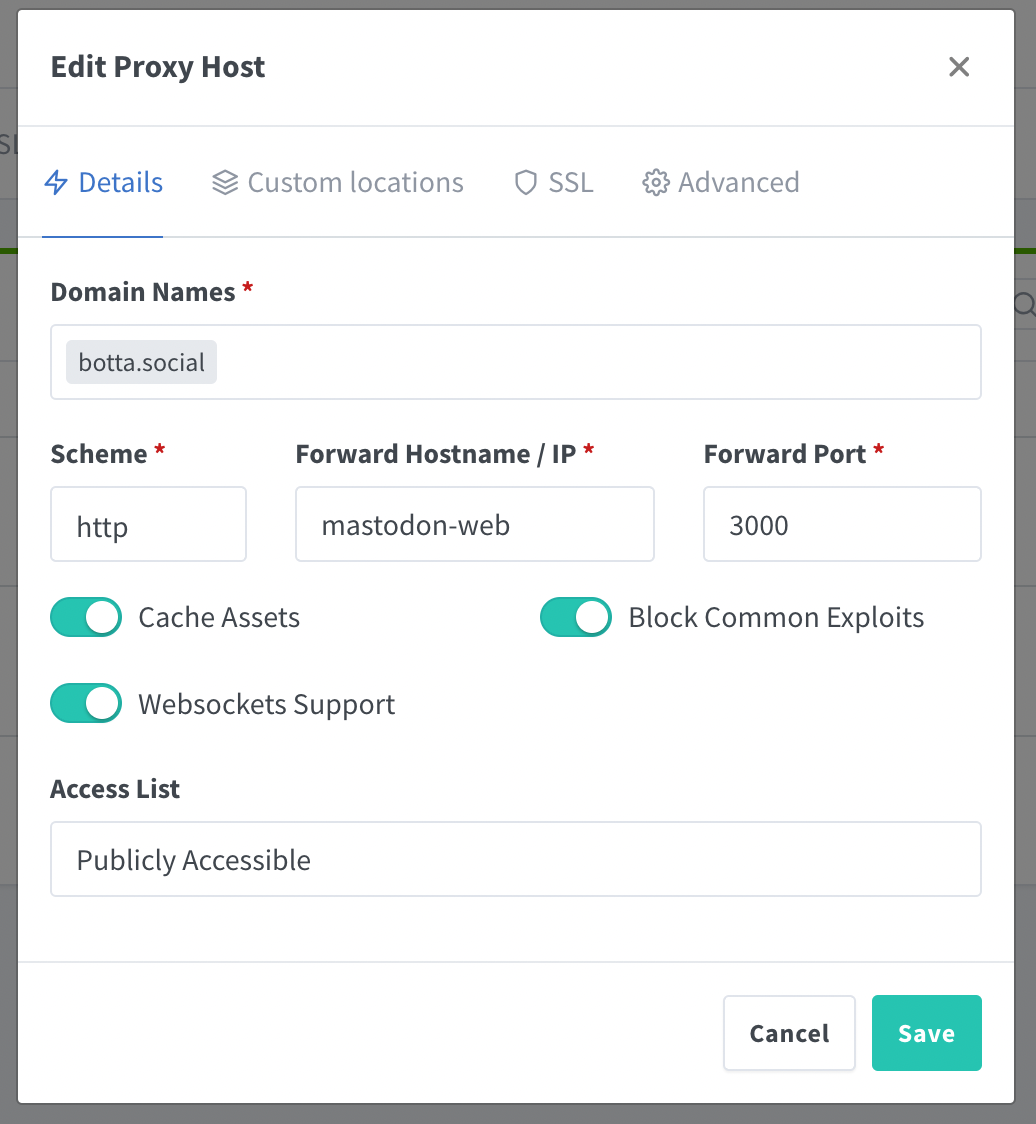
Now go to Proxy Hosts, and add a new host:
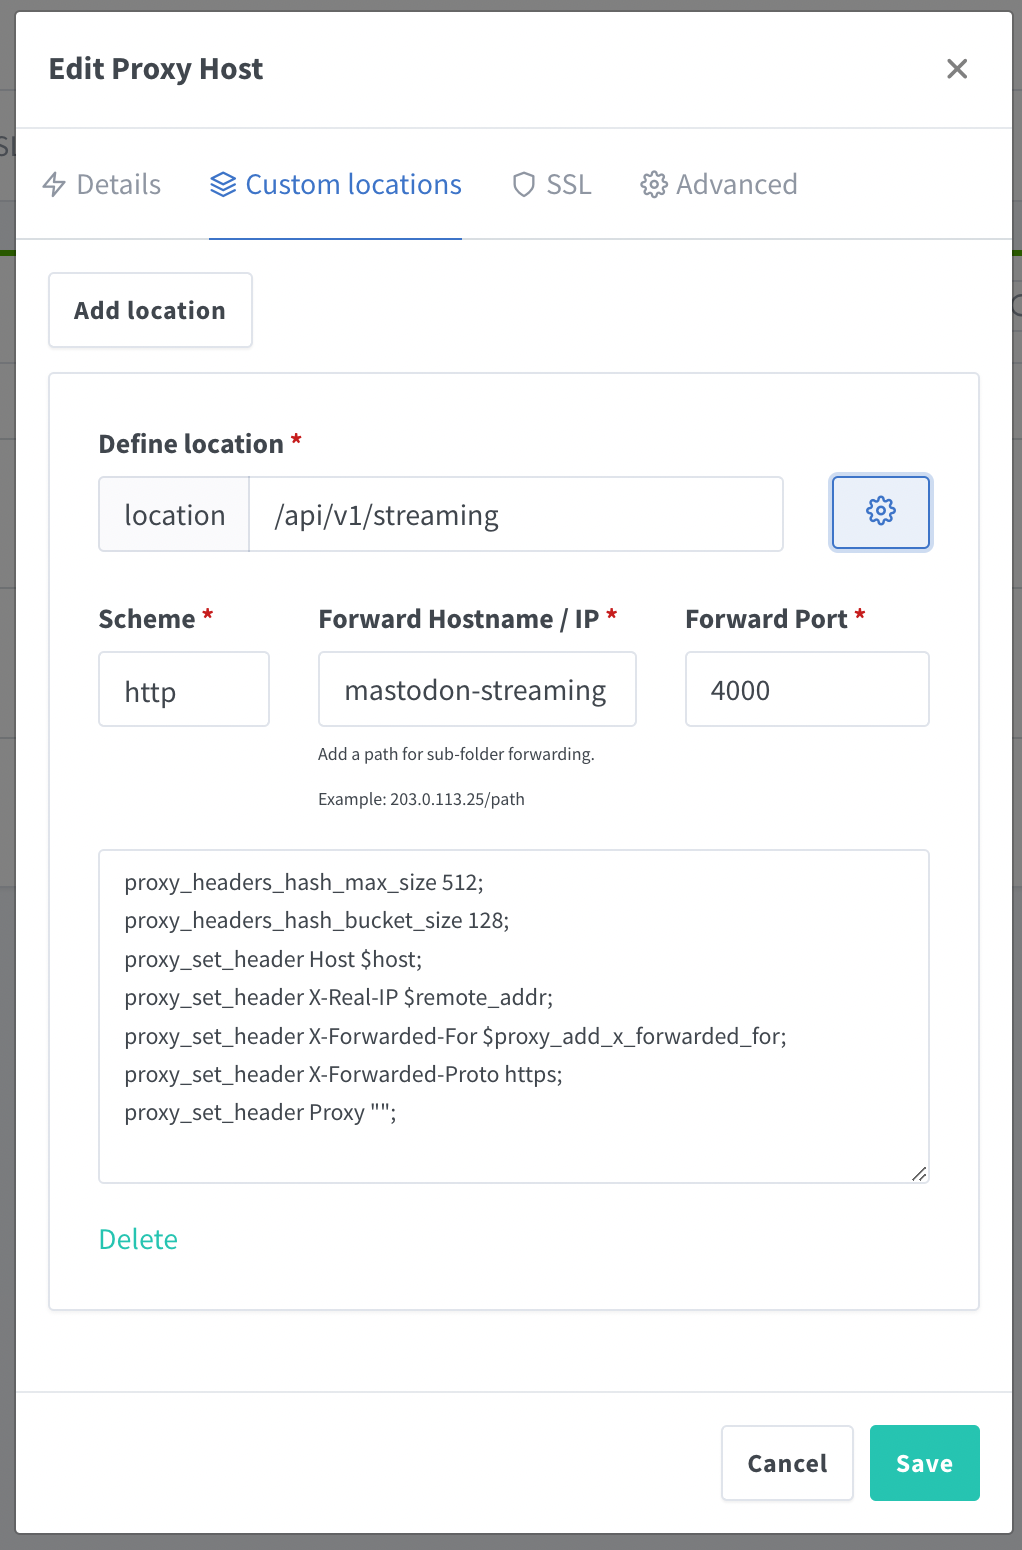
Of course, use your own domain instead of botta.social. Before you save, go to Custom locations and add the location for the streaming as in the picture:
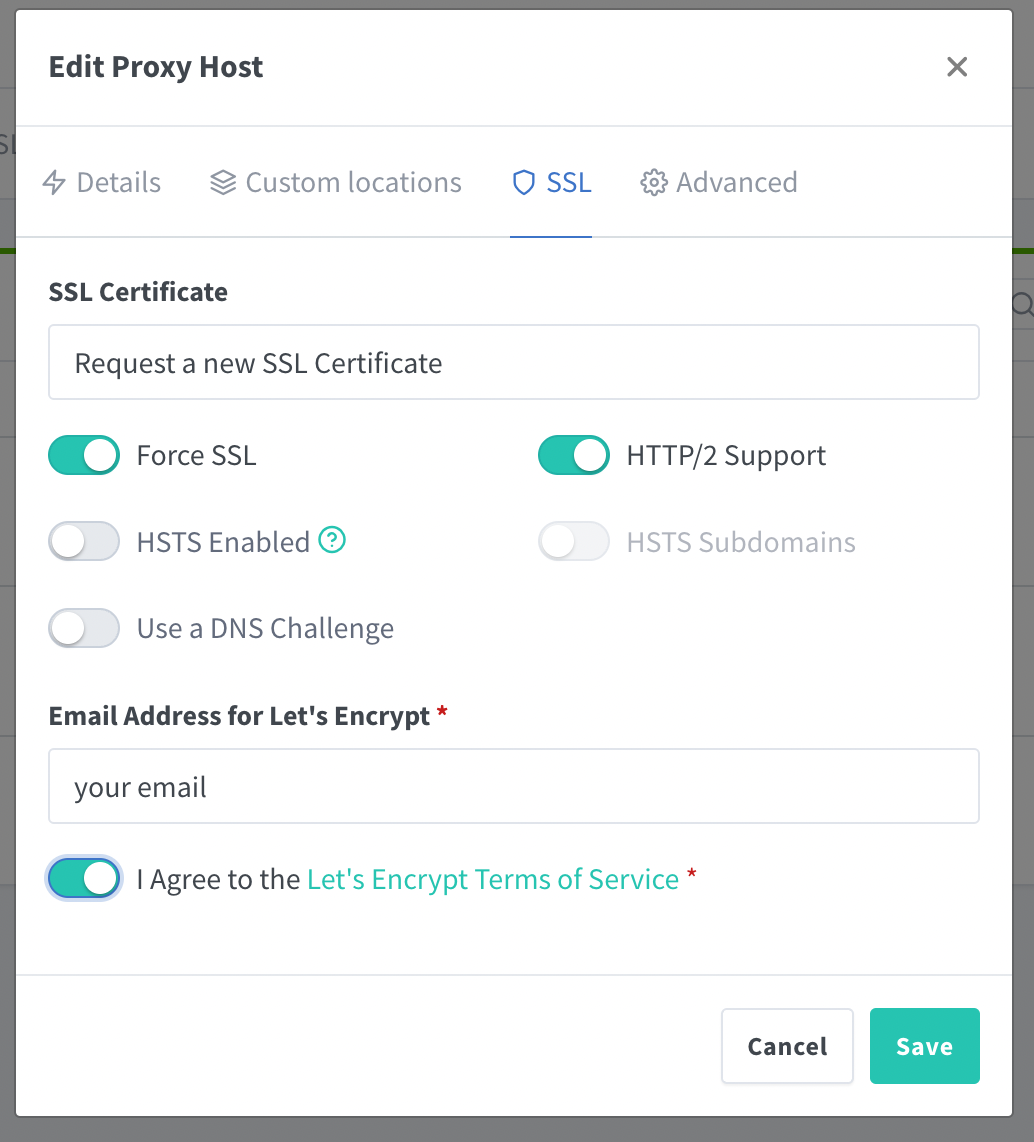
Under SSL, configure as in the picture:
Specify your email address for Let's Encrypt notifications (Nginx Proxy Manager uses Let's Encrypt to provision free SSL certificates), then go to Advanced and enter the following in the textarea:
You can now save. It will take a few moments because it will provision the certificate. Once it's ready, you will be able to log in to your Mastodon instance at your custom domain. Yay!!!
The setup at this point is basically complete, but there is one more thing we need to cover.
Backups
When you created the server, you probably enabled backups as I recommended. These backups are useful to restore the full instance in case something happens, but they happen at the most once a day. I recommend you also set up an off site backup of the data and that you run these backups more frequently so to minimize the data loss in case the server get screwed ad you need to set things up again.
For these backups you can use any tool, but one relatively new tool I like is Kopia, which is like an improved version of the popular Restic. Kopia works well with S3 compatible storage, and we are already using Wasabi (or whichever other service you decided to use instead of it), so we can just use a bucket there.
So head to Wasabi, and create a bucket with a unique name specifically for backups. Then install Kopia on the server:
Replace the username, and configure the access/secret keys, the bucket name for the backups and the region and endpoint, if you have chosen another region for the bucket. You will be asked for a password to use to encrypt the backups.
The command above will prepare the Kopia repository. Then create the file ~/.kopiaignore
The password is the encryption password you set when preparing the repo.
We also want to back up the MariaDB database for Nginx and the Postgres one for Mastodon, as well as automate the full backup. For this create a directory named ~/scripts, and a file backup-mariadb in it with the content below:
#!/bin/bash

set -e

BACKUP_DATE=`date +%Y/%m/%d`
BACKUP_TIME=`date +%H-%M-%S`
NUMBER_OF_DAYS=7

BACKUP_DIR="/home/vito/backups/mariadb"
BY_DATE_DIR="$BACKUP_DIR/by-date/"
LATEST_DIR="$BACKUP_DIR/latest/"
DUMP_DIR="$BY_DATE_DIR$BACKUP_DATE"

DATABASES=(nginx)

mkdir -p $LATEST_DIR
mkdir -p $DUMP_DIR

for DATABASE in ${DATABASES[@]}; do
  SQL="$DATABASE-$BACKUP_TIME.sql"
  DUMP_PATH="$DUMP_DIR/$SQL"

  echo Dumping $DATABASE to $DUMP_PATH...

  mysqldump -uroot -p<mariadb password> -h 127.0.0.1 --opt $DATABASE > $DUMP_PATH

  gzip $DUMP_PATH

  ln -fs $DUMP_PATH.gz $LATEST_DIR$DATABASE.sql.gz
done

find $BY_DATE_DIR/*/*/* -type d -mtime +7 -exec rm -rf {} \;
find $LATEST_DIR/ -type f -mtime +7 -exec rm -f {} \;
Change the MariaDB password and make the script executable with
#!/bin/bash

[ "${FLOCKER}" != "$0" ] && exec env FLOCKER="$0" flock -en "$0" "$0" "$@" || :

date

set -e

echo "Backing up mariadb databases..."
/home/vito/scripts/backup-mariadb
echo
echo

echo "Backing up postgres databases..."
/home/vito/scripts/backup-postgres
echo
echo

echo "Backing up apps to Wasabi..."
/home/vito/scripts/backup-wasabi
echo
echo

echo "...Backup complete."
And make it executable:
chmod +x scripts/backup
Run it a first time:
scripts/backup
This should dump the databases in the ~/backup directory (with a 7 days retention), and then create a snapshot with Kopia.
Finally, schedule the backups with crontab:
0 * * * * /home/vito/scripts/backup
In the example above, I am backing up my instance every hour.
Wrapping up
It's not easy to say for sure what will happen to Twitter in the future given the new ownership, but regardless I think Mastodon is worth looking into, because I think it's an awesome networking option in is own right. If you, like me, prefer taking advantage of the possibility of being in full control with your own Mastodon instance, you should find this post useful. I hope I didn't forget anything, but if you run into any issues let me know in the comments and I will try to help if I can. Also if you are interested in web programming (especially with Ruby and Ruby on Rails), containers, Docker, Kubernetes and devops, plus the occasional random stuff, don't forget to follow me. My handle is @[email protected].
While closing, I'd like to mention a few useful sites that could help you find communities and people to follow:
There is also a tool that can automatically crosspost your tweets and "toots" (as they are called in Mastodon) between Twitter and Mastodon, if you haven't decided to leave Twitter yet:
I am passionate about WebDev, DevOps and CyberSecurity. I am based in Espoo, Finland, where I work with the backend team at Brella.
I also started again "building in public", and the first project is DynaSite, a static site and blog hosting platform with an a visual page builder and cool AI features.
If you like my content or my open source tools, please consider sponsorsing me.
My roles as architect, coder and technology enthusiast overlap each other here on this web log.
Unless otherwise noted, the views expressed on these pages are mine alone and not those of my employer.

 I am passionate about WebDev, DevOps and CyberSecurity. I am based in Espoo, Finland, where I work with the backend team at