Integrating Chargebee subscriptions and recurring billing with a Rails app
 Published
Introduction - why use a subscriptions management/recurring billing software
When working on a SaaS such as DynaBlogger, one obvious thing you'll need to implement at some point - well, if you want to get paid for it! - is subscriptions management with recurring billing. At a minimum, you need to use a payment gateway such as Stripe or similar if you build everything yourself. Stripe is likely the most popular gateway among developers thanks to great APIs and documentation, and is pretty easy to integrate with an existing app. It has some limits though. It's a payment gateway at its core, meaning that other features like subscriptions management - while available with Stripe Billing - are somewhat limited. Besides, if you use Stripe with your app you have a limited choice of payment methods unless you implement something like PayPal or others alongside Stripe.
I also don't like the idea of having both recurring payments and subscriptions management with a single provider. I've read a few stories of people who've seen their accounts suspended or closed, so it's a risk in my opinion.
For these reasons I decided to use Stripe as payment gateway only, and use something else to manage subscriptions, namely Chargebee. It's an awesome service with a ton of powerful features that make managing subscriptions and recurring billing a lot easier. Documentation is extensive (although it could be improved in a few areas), the app is pretty easy to integrate with your own app and support is just great - I've contacted them several times and each time I had friendly and helpful responses without waiting too much. Also, PayPal didn't want to enable "reference transactions" for me which are required by Chargebee - if I understand it correctly it is for recurring payments - because my account is new. Chargebee contacted them on my behalf and PayPal enabled reference transactions for me right away! Really impressive. I think their customer service/support is the best I have experienced so far.
Chargebee also offers a Launch plan which is totally free of charge until you reach $50K (or €45K) in revenue. After that, it switches to a $99/mo plan automatically with some overcharge if your revenue goes above 25K/mo. There are bigger plans of course that scale with your revenue and offer additional features. Stripe Billing might be cheaper (with only a small transaction fee on top of the gateway fee) but like I said, it's limited in comparison and it has a long way to catch up at the moment. But knowing that with Chargebee I can use multiple gateways and switch between them easily makes the choice even easier for me. There are many other subscriptions management/recurring billing services available, but I prefer Chargebee because of the better balance between pricing and features.
You might still be wondering why use something like Chargebee vs building out subscriptions and recurring billing yourself, for example with Stripe directly. Besides the limitations I already mentioned about building with Stripe, there's quite a bit of development effort involved if you do everything yourself. With Rails you can use the pay gem by Chris Oliver - the awesome guy who runs the popular e-learning platform for Rails devs GoRails - to make your life easier. Chris also sells a comprehensive course that teaches you how to integrate recurring payments etc from scratch if you want.
I actually bought the course, but I decided to go with Chargebee. It's a much better solution than whatever I might build myself in a short time since I wanted to launch soon. With Chargebee it's mostly a set and forget thing. You just configure plans and all the rest and don't need to worry about keeping your payments features in sync with new regulations and such. There's a very little coding involved.
Integrating Chargebee with a Rails app - checkout for a new subscription
Chargebee is pretty easy to integrate with a Rails app. You can still build everything yourself using their API similarly to Stripe (in which case you would still benefit from the many more features), but the easiest way is to use their hosted pages for checkout and subscription management. There's the option of an "in-app checkout" that literally takes a couple of lines of code at a minimum (one script and a link to open the checkout in a modal - same thing for the self service portal.
The in-app checkout, out of the box, requires the user to enter all their information including name, email alongside billing address and payment method, so it's good if you want to delegate account management to Chargebee. In my case, I prefer managing accounts in my app since I have a lot more control, so what I do when I need to open the checkout is first make an API call that generates a unique checkout URL with the customer's account details already, together with the plan the user wants to subscribe to. Then with the Chargebee JavaScript library I open this URL in the modal iframe and the user can quickly subscribe to the selected plan. Same thing for the self service portal: an API call to create a unique URL for the user and then this URL is opened in a modal as well. From there, the user can update payment method and billing details, cancel the subscription etc. Chargebee allows some basic customisation of the in-app checkout and portal so they look good in your own app.
The very first thing you'd need to do before we jump into the code, is of course create a Chargebee account. This will give you a test site that you can use for development and - when you activate it - a live site which you will use for production. There's quite a bit of configuration you can do in Chargebee to make it work exactly as you wish, and one awesome thing is that you can quickly copy selected configuration settings from the test site to the live site, so you don't have to reconfigure everything from scratch for production.
So go ahead, create a Chargebee account and configure at least some plans, and whatever else you like. In the test environment you can use a fake payment gateway provided by Chargebee and already configured.
Let's see how the actual integration can be done now.
To begin with, add the Chargebee gem to your Gemfile and run `bundle install`:
gem 'chargebee', '~> 2.7', '>= 2.7.5'Then create an initializer in config/initializers/chargebee.rb and configure API access:
ChargeBee.configure(site: Settings.chargebee_site, api_key: Settings.chargebee_api_key)The site is the sub domain created for you when you signed up, and you can find the API key in the Chargebee configuration.
Before you continue, fire up the Rails console and ensure the API can be consumed correctly:
ChargeBee::Plan.listYou should get the list of the plans you've created earlier.
Next, we need a class that we'll use to create the unique URLs for checkout and portal together with a few other things. I keep this in app/models/charge_bee/client.rb. Let's start with the method that creates the URL for the in-app checkout:
class ChargeBee::Client
  def self.checkout_new(user:, plan_id:)
    result = ChargeBee::HostedPage.checkout_new({
      subscription: {
        plan_id: plan_id
      },
      customer: {
        first_name: user.first_name,
        last_name: user.last_name,
        email: user.email,
        cf_environment: Rails.env.to_s
      },
      embed: false,
      redirect_url: redirect_url
    })

    result.hosted_page
  end

  private

    def self.redirect_url
      Rails.application.routes.url_helpers.subscription_url
    end

end
This method expects a user (or other billable model in your app), and the ID of a plan you configured in Chargebee. We pass this plan ID with the subscription options, and also pass the name and email of the user/customer so that they don't have to enter this information in the checkout manually.
As you can see, we are also setting cf_environment to the current Rails environment. There's a reason for this: whenever something happens in Chargebee (a subscription is created or updated and things like that), Chargebee fires an asynchronous event that is sent to one or more webhooks you specify in the configuration. You can configure multiple webhooks, but you only have one test site, so if your app has a development and a staging environments for example, you need a means to tell apart events generated by each so the webhook endpoint knows which events to process, ignoring events that are for another environment. cf_environment doesn't exist yet, you need to create a custom field with that name in Chargebee's configuration.
embed must be set to false if you want to use the recommended modal checkout, otherwise Chargebee expects that the checkout page be opened in an iframe. redirect_url is the URL you want Chargebee to redirect the user to when the checkout is complete. What the API call returns is a HostedPage object which must be returned in JSON format to the Chargebee JavaScript library so that it can open the checkout in a modal.
Next, add the following route to your routes.rb:
get "/checkout/new/:plan_id" => "charge_bee#checkout_new"This expects a controller which we'll create in app/controllers/charge_bee_controller.rb:
class ChargeBeeController < ApplicationController
  def checkout_new
    result = ChargeBee::Client.checkout_new(
      user: current_user, plan_id: params[:plan_id]
    )

    render json: result
  end
end
So we just use the class we created earlier and return the JSON of the checkout hosted page for the given plan and user.
Now add the Chargebee script to your appllication.html.erb or equivalent layout:
<script src="https://js.chargebee.com/v2/chargebee.js"></script>Also add a meta tag for the Chargebee site to use for the checkout:
<meta name="chargebee-site" content="<%= Settings.chargebee_site %>">(I am using some Settings class that loads config settings and secrets from the environment. You can of course use whatever you want for this).
Next, add the following link to some view:
<a
  data-action="click->subscriptions#openCheckoutNew"
  data-plan-id="...">
  Subscribe
</a>
In this post I am going to assume you use Stimulus.js in your app because that's what I use. If you use something else you just need to adapt the code to your frontend code. So let's add the Stimulus controller app / javascript / controllers / subscriptions_controller.js:
import { Controller } from "stimulus"
export default class extends Controller {
connect() {
const chargebeeSite = document.querySelector("meta[name='chargebee-site']").getAttribute("content")
this.chargebeeInstance = window.Chargebee.init({ site: chargebeeSite })
}
openCheckoutNew(e) {
e.preventDefault()
const planId = e.target.dataset.planId
this.chargebeeInstance.openCheckout({
hostedPage: () => {
return fetch(`/checkout/new/${planId}`).then(response => response.json())
},
error: (e) => {
console.log(e)
}
})
}
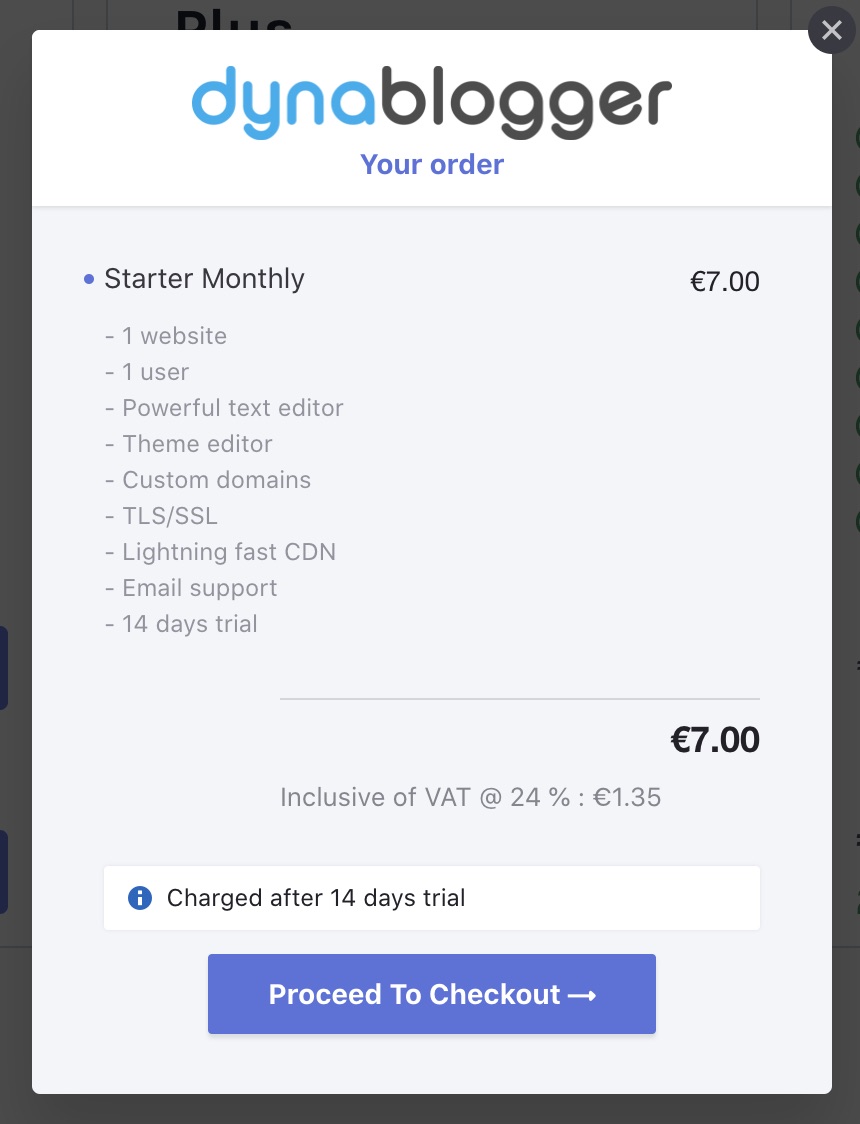
}Here we first initialise Chargebee for the site we have specified in the meta tag, then we open an instance of the checkout for the plan specified in the Subscribe link. As you can see we make a call to the endpoint we added earlier, which creates a unique checkout URL for the current user and the selected plan. If you did everything correctly, you should see a checkout modal similar to the one in the picture below when you click on the link:
Go ahead and test creating a subscription. We are not done yet, because our app doesn't know yet that a subscription has been created in Chargebee, so we are not able yet to enable/disable features depending on the plan selected.
Chargebee will send an async event to our webhook - which we don't have yet - but there's a small delay so it can easily happen that by the time the checkout is completed and closed, the event hasn't reached your webhook yet. This is easy to fix. When the checkout is complete, Chargebee will redirect the user to the redirect_url we specified earlier (the subscription route) and pass the ID of the hosted page that was opened in the checkout. So once the redirect page loads, we can use this ID to fetch the instance of the hosted page, which contains the subscription object. We can then use this to create a subscription locally for caching (so we don't have to query the API all the time - there's a rate limit of 150 requests per minute if I am not mistaken).
So... we need a few changes to our database for this to work:
- add the chargebee_customer_id column to the User model
- create the Plan model with these attributes: chargebee_plan_id, name, invoice_name, currency_code, price, period, period_unit, status, archived_at, trial_period, trial_period_unit. I also have some other columns like flags for features and things like that, which depend on your app. The attributes listed are attributes we are likely to need in most cases.
- create the Subscription model with these attributes: user:belongs_to, chargebee_subscription_id, chargebee_plan_id, currency_code, trial_end, status. In the subscription model also add a plan method that returns the correct method by chargebee_plan_id.
Next, we need to add a route for the subscription page:
get "/subscription" => "subscriptions#index", as: :subscriptionAnd a SubscriptionsController:
class SubscriptionsController < ApplicationController
  def index
    if params[:id].present?
      if hosted_page = get_hosted_page(params[:id])
        if result = get_subscription(hosted_page&.hosted_page&.content&.subscription&.id)
          sync_subscription(result)
        end
      end

      redirect_to subscription_path
    end
  end

  private

    def get_hosted_page(id)
      return unless id
      ChargeBee::HostedPage.retrieve(id)
    rescue ChargeBee::InvalidRequestError
    end

    def get_subscription(id)
      return unless id
      ChargeBee::Subscription.retrieve(id)
    rescue ChargeBee::InvalidRequestError
    end

    def sync_subscription(api_result)
      ChargeBee::Client.sync_subscription(
        customer: api_result.customer,
        subscription: api_result.subscription
      )
    end
end
So, what happens here is that if the id param is present, it means that the checkout was completed, so we can get the new subscription ID from the hosted page first, and then fetch the subscription so we get up to date info about the subscription just created. Let's go back to the ChargeBee::Client class and add the sync_subscription method:
  def self.sync_subscription(customer:, subscription:)
    if user = User.find_by(email: customer.email)
      User.transaction do
        user.update! chargebee_customer_id: customer.id

        attrs = {
          user_id: user.id,
          chargebee_subscription_id: subscription.id,
          currency_code: subscription.currency_code,
          chargebee_plan_id: subscription.plan_id,
          status: subscription.status,
          trial_end: (DateTime.strptime(subscription.trial_end.to_s,'%s') if subscription.trial_end.present?)
        }

        Subscription.upsert(attrs, unique_by: %i[ user_id ])
      end
    end
  rescue ChargeBee::InvalidRequestError
    # subscription not found
  end
The sync_subscription method has the job of setting the chargebee_customer_id for the user so we can link the user to the Chargebee customer, as well as create or update a subscription locally that mirrors the subscription in Chargebee. Since I am on Rails 6.1 (master), I'm using the upsert method for this, so you may have to change this slightly if you are on an older version of Rails. To use upsert and make sure that there's only one subscription for the user at any time, I've made the index on the user_id unique with a migration.
As you may have noticed, in the controller we redirect to the same subscription page again after syncing the subscription. This is just to avoid making API calls again in the case the user refreshes the page, because the id param would still be present. To ensure that any controller action is aware of the user's subscription, let's add a before_action to the ApplicationController:
before_action :set_plan_and_subscription

private

  def set_plan_and_subscription
    return unless signed_in?
    Current.subscription = current_user&.subscription
    Current.plan = Current.subscription&.plan
  end
I'm using the Current class that comes with Rails to set subscription and plan for the current user in such a way that these are available anywhere in the app without passing them around all the time. So far we have synced the subscription but we don't have the plans yet in our database. For this let's add the method sync_plans to our ChargeBee::Client class:
  def self.sync_plans
    entries = []

    next_offset = nil
    new_entries = ChargeBee::Plan.list(limit: 25)
    next_offset = new_entries.next_offset

    new_entries.each do |entry|
      entries << entry
    end

    while next_offset
      new_entries = ChargeBee::Plan.list(offset: next_offset, limit: 25)
      next_offset = new_entries.next_offset
      new_entries.each do |entry|
        entries << entry
      end
    end

    records = entries.map do |entry|
      chargebee_plan = entry.plan

      {
        chargebee_plan_id: chargebee_plan.id,
        name: chargebee_plan.name,
        invoice_name: chargebee_plan.invoice_name,
        price: chargebee_plan.price,
        currency_code: chargebee_plan.currency_code,
        period: chargebee_plan.period,
        period_unit: chargebee_plan.period_unit,
        trial_period: chargebee_plan.trial_period,
        trial_period_unit: chargebee_plan.trial_period_unit,
        status: chargebee_plan.status,
        archived_at: (DateTime.strptime(chargebee_plan.archived_at.to_s,'%s') if chargebee_plan.archived_at.present?)
      }
    end

    Plan.upsert_all(records, unique_by: %i[ chargebee_plan_id ])
  end
We make one or more API calls to fetch the plans - since Chargebee uses pagination for the results - and then we can use upsert again to create or update the plans in our database. I added a unique index to the chargebee_plan_id column to prevent duplicates.
Go ahead and run this method in the Rails console manually to fetch the plans. We will also use this method in the webhook later each time a plan event is raised by Chargebee (when we create or update plans).
So far we have:
- configured API access
- made it possible for the user to open the checkout for the selected plan in a modal, and subscribe
- ensured that both the plans and the newly created subscription are mirrored to our database.
In DynaBlogger I use the plans to generate the pricing table with the various Subscribe buttons in the subscription page, so you may want to do the same.
Switching to another plan
To allow the user to switch to another plan, the process is very similar to that for the checkout when creating a new subscription. First we need a new method in our ChargeBee::Client class to generate a unique URL for the upgrade/downgrade:
  def self.checkout_existing(subscription_id:, plan_id:)
    result = ChargeBee::HostedPage.checkout_existing({
      subscription: {
        id: subscription_id,
        plan_id: plan_id
      },
      embed: false,
      redirect_url: redirect_url
    })

    result.hosted_page
  end
In this case we have a subscription ID already, so we pass this as well as the plan we want to switch to. Now back to the subscriptions_controlller.js we need to add a method to open the checkout with the upgrade/downgrade URL:
  openCheckoutExisting(e) {
    e.preventDefault()
    const subscriptionId = e.target.dataset.subscriptionId
    const planId = e.target.dataset.planId

    this.chargebeeInstance.openCheckout({
      hostedPage: () => {
        return fetch(`/checkout/existing/${subscriptionId}/${planId}`).then(response => response.json())
      },
      error: (e) => {
        console.log(e)
      }
    })
  }
Finally we need a link to trigger this:
<a
  data-action="click->subscriptions#openCheckoutExisting"
  data-subscription-id="<%= Current.subscription&.chargebee_subscription_id %>"
  data-plan-id="...">
  Switch plan
</a>
And a route:
get "/checkout/existing/:subscription_id/:plan_id" => "charge_bee#checkout_existing"Go ahead and test switching to another plan and verify the change in Chargebee.
The webhook
Syncing the subscription to our database when a subscription is created or updated through the checkout is not enough. We also want to be notified for example when a subscription with trial is activated, or other event that might happen directly in Chargebee. We need a webhook for this.
I'll paste here the entire webhook endpoint that goes into the ChargeBeeController we created earlier:
  def webhook
    render plain: "Unauthorized", status: 401 unless params[:token] == Settings.chargebee_webhook_token

    content = params[:content]

    case params[:event_type]
    when "plan_created",
         "plan_updated",
         "plan_deleted"

         ChargeBee::Client.sync_plans

    when "subscription_created",
        "subscription_started",
        "subscription_activated",
        "subscription_changed",
        "subscription_cancelled",
        "subscription_reactivated",
        "subscription_renewed",
        "subscription_paused",
        "subscription_resumed"

      if content.customer.cf_environment == Rails.env.to_s
        ChargeBee::Client.sync_subscription(
          customer: content[:customer],
          subscription: content[:subscription]
        )
      end

    when "subscription_deleted"
      if (content.customer.cf_environment == Rails.env.to_s) and
          (user = User.find_by(email: content[:customer][:email]))
        ChargeBee::Client.remove_subscription(user)
      end

    when "customer_deleted"
      if (content.customer.cf_environment == Rails.env.to_s) and
        (user = User.find_by(email: content[:customer][:email]))
        ChargeBee::Client.remove_subscription(user)
      end

    end

    render plain: "OK"
  end
This is pretty straightforward. First we verify that the correct token is passed (so we are sure the request is made by Chargebee), then we extract data about the customer, subscription from the params and we update or delete the subscription depending on the event. We also sync the plans to our database whenever a plan is created, updated or deleted in Chargebee. As you can see we check the environment so we only process events generated for the current Rails environment. We don't have the remove_subscription method yet so let's add that to ChargeBee::Client:
  def self.remove_subscription(user)
    User.transaction do
      user.update! chargebee_customer_id: nil
      user.subscription&.destroy!
    end
  end
Finally we need a route for the webhook:
post "/chargebee/webhook/:token" => "charge_bee#webhook", as: :chargebee_webhookThis is all you need to create subscriptions and switch to another plan. I have omitted some details such as columns that I use to generate pricing tables with the features for each plan and things like that which are specific to my app. Now go ahead and configure the webhook in Chargebee using the URL yourdomain.com/chargebee/webhook/<the expected token>.
The self service portal
To allow users to cancel/reactivate and pause/resume the subscription, or update billing address or payment method, we can open the self-service portal in a modal the same way we open the checkout pages. Add a new action to the ChargeBeeController for this:
  def portal_session
    result = ChargeBee::PortalSession.create({
      :customer => { id: current_user.chargebee_customer_id }
    })

    render json: result.portal_session
  end
All we need here is the customer ID in Chargebee.
Then add the following to subscriptions_controller.js:
  openPortalSession(e) {
    e.preventDefault()
    this.chargebeeInstance.setPortalSession(() => {
      return fetch(`/billing`).then(response => response.json())
    })

    let chargebeePortal = this.chargebeeInstance.createChargebeePortal()

    chargebeePortal.open({
      error: (e) => {
        console.log(e)
      }
    })
  }
And a route:
get "/billing" => "charge_bee#portal_session"Finally, a link to open the portal:
<a data-action="click->subscriptions#openPortalSession">
  Open billing
</a>
The user should now be able to open the portal with one click.
Account cancellation
The final bit of the integration is to ensure that the subscription is automatically cancelled in Chargebee when the user cancels their account in your app. This requires a simple API call:
    if user.subscription.present?
      ChargeBee::Subscription.cancel(user.subscription.chargebee_subscription_id, {
        end_of_term: false,
        credit_option_for_current_term_charges: "prorate",
        unbilled_charges_option: "invoice",
        account_receivables_handling: "schedule_payment_collection",
        refundable_credits_handling: "schedule_refund"
      })
    end
Check the documentation for the various settings.
Conclusions
As it is often the case, it took almost as long to write this post as it takes to actually integrate Chargebee. As you can see it's pretty simple and requires very little code. But you really gain a ton of functionality as a reward, and you don't need to touch your code if you change payment gateways or some regulation changes. I am happy with this and even happier that Chargebee doesn't cost me anything in the beginning. Chargebee has many integrations with other services and one really cool feature is the "Time Machine". It basically allows you to "travel in time" in the test environment to test events that occur over time (such as dunning, activation after trial etc) more easily.
If you are thinking of building subscriptions and recurring billing yourself, I recommend you consider this route as well. It's a matter of mostly configuring + a little code vs building everything from scratch and it could save you a ton of time and headaches.
 I am passionate about WebDev, DevOps and CyberSecurity. I am based in Espoo, Finland, where I work with the backend team at