CentOS Parallels VM network configuration
 Published
This is how I fixed an issue with networking in CentOS Parallels virtual machines . Basically, after cloning the template, the clones appear to report only the loopback interface and one eth interface which seems to be inactive, so of course Internet doesn’t work:
[root@centos ~]# ifconfig -a
eth1 Link encap:Ethernet HWaddr 00:1C:42:22:36:26
BROADCAST MULTICAST MTU:1500 Metric:1
RX packets:2464262 errors:0 dropped:0 overruns:0 frame:0
TX packets:1221954 errors:0 dropped:0 overruns:0 carrier:0
collisions:0 txqueuelen:1000
RX bytes:3716624972 (3.4 GiB) TX bytes:106808282 (101.8 MiB)

lo Link encap:Local Loopback
inet addr:127.0.0.1 Mask:255.0.0.0
inet6 addr: ::1/128 Scope:Host
UP LOOPBACK RUNNING MTU:65536 Metric:1
RX packets:3502 errors:0 dropped:0 overruns:0 frame:0
TX packets:3502 errors:0 dropped:0 overruns:0 carrier:0
collisions:0 txqueuelen:0
RX bytes:359663 (351.2 KiB) TX bytes:359663 (351.2 KiB)
[root@centos ~]# ping 8.8.8.8
connect: Network is unreachable
I am not too familiar with CentOS so I googled and found out that networking is disabled in the default installation or something like that.
Anyway, in case someone runs into the same issue, if you run ifup it complains that the configuration for the eth interface could not be found:
[root@centos ~]# ifup eth1
/sbin/ifup: configuration for eth1 not found.
Usage: ifup <device name>
I’ve had this particular issue – missing network configuration – only with CentOS VMs, but networking doesn’t work with Ubuntu VMs either after cloning. On Ubuntu however I usually run
rm /etc/udev/rules.d/70-persistent-net.rules
and then reboot the VM, and that usually fixes it. I tried the same on the CentOS clones but it didn’t work.
It turns out on the CentOS clones there is a profile for the loopback interface and a profile for eth0 but not for eth1 – which is the interface I see in the VMs after cloning – and that’s the the reason why the configuration could not be found:
[root@centos ~]# ls /etc/sysconfig/network-scripts/ifcfg*
/etc/sysconfig/network-scripts/ifcfg-eth0 /etc/sysconfig/network-scripts/ifcfg-lo
So the way I fixed the missing configuration was by making a copy of the eth0 profile for eth1, and updating the content of the new profile with the correct device name and MAC address. First, make a copy of the profile:
[root@centos ~]# cd /etc/sysconfig/network-scripts/
[root@centos network-scripts]# cp ifcfg-eth0 ifcfg-eth1
Then, open the new profile with any editor and make sure the DEVICE name is eth1 (or whatever ethX it is for you if you have removed/added virtual NICs) and that HWADDR is set to the MAC address of the VM:
DEVICE=eth1
HWADDR=00:1C:42:22:36:26
TYPE=Ethernet
UUID=6326455c-37eb-48f7-b2a4-0dbf113e3c93
ONBOOT=no
NM_CONTROLLED=yes
BOOTPROTO=dhcp
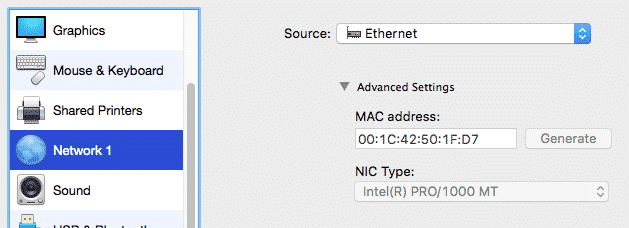
You can find the MAC address in the Network > Advanced Settings of the virtual machine:
Then, run
[root@centos network-scripts]# ifup eth1

Determining IP information for eth1... done.
And Internet should now work:
[root@centos network-scripts]# ping 8.8.8.8
PING 8.8.8.8 (8.8.8.8) 56(84) bytes of data.
64 bytes from 8.8.8.8: icmp_seq=1 ttl=53 time=25.9 ms
...
That’s it. Not sure why this happens but anyway it’s easy to fix.
 I am passionate about WebDev, DevOps and CyberSecurity. I am based in Espoo, Finland, where I work with the backend team at