L2TP IPSec VPN for private browsing
 Published
Why an L2TP IPSec VPN
I use VPNs all the time these days to access resources that I have restricted on the servers I manage. I also want to be able to watch live TV programs from various countries regardless of where I am; in most cases live TV is only available in the country of origin, therefore without a VPN or similar solutions it is not possible to watch them from elsewhere, using the original websites. I know that there are reasons for these geographical restrictions, but that’s not the point of this article ;). I also own an iPad and an iPhone so I prefer having a private connection when I am on the move and need to surf the Internet or just check my emails, but have to use some network over which I have no control. Gmail and many sites I need use SSL, but nevertheless using a VPN gives peace of mind since you don’t have to worry as much about how much attention has been paid to the security aspects of these services, at least as far as the encryption of the data is concerned. So the VPN I use must also be compatible with these devices, and that’s why I have replaced my long time favourite OpenVPN with an L2TP IPSec VPN on each of my servers. These VPNs are IMO simpler to setup, secure, and compatible with most operating systems and devices without requiring additional client software in order to establish the connection. This is a plus, since it means I can also configure a VPN access on my iPhone without having to jail break it or install third party apps to be able to use another VPN.
So here’s a simple guide on how to set up an L2TP IPSec VPN on a Ubuntu server and get both a Mac and an iPhone connected. The process should be very similar with other Linux distributions. Hopefully this will help you save some trial and error; I won’t go in the details for each setting or command as I am myself not too familiar with several of them; so if you just want a “fast-track” how-to here you are.
To set up an L2TP IPSec VPN, you’ll need to install OpenSwan, which is an IPSec implementation for Linux; IPSec is responsible for the encryption of the packets.
apt-get install openswan
You will be asked Do you have an existing X509 certificate file that you want to use for Openswan?. If you, like me, want an L2TP IPSec VPN compatible with iPhones/iPads and other devices, answer No since these typically do not support setups with certificates.
Next you’ll need to edit a few configuration files. I’ll paste below the settings I currently use on 5 L2TP IPSec VPN servers and that I know work for sure; you may want to empty those files before pasting the configurations I suggest, just to keep things simpler.
First, edit /etc/ipsec.conf and change/add the following settings:
version 2.0
config setup
nat_traversal=yes
virtual_private=%v4:10.0.0.0/8,%v4:192.168.0.0/16,%v4:172.16.0.0/12
oe=off
protostack=netkey

conn L2TP-PSK-NAT
rightsubnet=vhost:%priv
also=L2TP-PSK-noNAT

conn L2TP-PSK-noNAT
authby=secret
pfs=no
auto=add
keyingtries=3
rekey=no
ikelifetime=8h
keylife=1h
type=transport
left=the public IP of your server
leftprotoport=17/1701
right=%any
rightprotoport=17/%any
Obviously, replace the value for the left setting with the actual public IP of the box on which you are installing the L2TP IPSec VPN server.
Next, edit /etc/ipsec.secrets and add the following:
(server's public IP) %any: PSK "Your shared secret"
Again, you will have to specify here the public IP of the server and also a shared secret that will be used on clients together with the credentials for each specific client account.
Now create the file /etc/vpn-setup and paste the following in it:
#!/bin/bash

echo 1 > /proc/sys/net/ipv4/ip_forward

for each in /proc/sys/net/ipv4/conf/*
do
echo 0 > $each/accept_redirects
echo 0 > $each/send_redirects
done
Making sure you make this file executable with:
chmod +x /etc/vpn-setup
This is required to redirect all the Internet traffic through the L2TP IPSec VPN gateway; to ensure the commands in the file are executed at startup, edit /etc/rc.local and add, before the exit 0 line, /etc/vpn-setup. Run /etc/vpn-setup once, manually for now, so to apply these settings for the current session, then restart IPSec:
service ipsec restart
Next, let’s configure some firewall rules to allow the redirection of the web traffic. If you are using iptables, run the following commands to apply the required rules immediately:
iptables -A INPUT -p udp -m udp --dport 500 -j ACCEPT
iptables -A INPUT -p udp -m udp --dport 4500 -j ACCEPT
iptables -A INPUT -p udp -m udp --dport 1701 -j ACCEPT
iptables -t nat -A POSTROUTING -s 10.1.2.0/24 -o eth0 -j MASQUERADE
iptables -A FORWARD -s 10.1.2.0/24 -j ACCEPT
Then backup the current configuration to file with:
iptables-save > /etc/iptables.rules
To ensure these rules are also applied at start up, update /etc/network/interfaces so it looks something like the following:
auto eth0
iface eth0 inet static
address ...
netmask ...
broadcast ...
network ...
post-up iptables-restore < /etc/iptables.rules
The important line that you need to add is the one starting with post-up.
At this point you should be able to establish an IPSec connection from a client -although we still need to sort out the authentication side- so it’s a good time to test this before going ahead:
ipsec verify
If all went well -and there are no problems with the version of the kernel you are using- you should see something like the following:
Checking your system to see if IPSec got installed and started correctly:
Version check and ipsec on-path [OK]
Linux Openswan U2.6.28/K2.6.32-5-686 (netkey)
Checking for IPSec support in kernel [OK]
NETKEY detected, testing for disabled ICMP send\_redirects [OK]
NETKEY detected, testing for disabled ICMP accept\_redirects [OK]
Checking that pluto is running [OK]
Pluto listening for IKE on udp 500 [OK]
Pluto listening for NAT-T on udp 4500 [OK]
Checking for 'ip' command [OK]
Checking for 'iptables' command [OK]
Opportunistic Encryption Support [DISABLED]
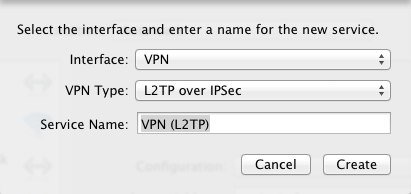
I can’t remember how to set up an L2TP IPSec VPN client on Windows or Linux desktop, but here’s how to do it on Mac: go to System Preferences -> Network, and create a new connection by clicking on the + button. When you’re asked for the type of the connection you want to create, choose VPN and leave the default type selected, in order to configure an L2TP IPSec VPN connection. Then give your connection whatever name you prefer:
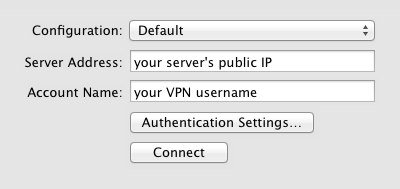
Then enter either the server’s IP or a hostname pointing to it, and in Account name enter whatever username you’ll want to use to establish the connection. Don’t worry if you haven’t configured this yet, the authentication will fail at first but we’ll need to verify the IPSec connection can be established correctly before proceeding with the rest of the configuration:
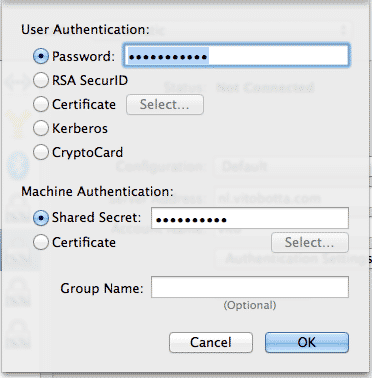
Next, in Authentication Settings you need to enter the password you are going to use with your account and the shared secret specified in /etc/ipsec.secrets:
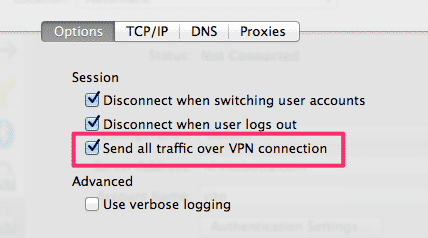
In Advanced make sure the option Send all traffic over VPN connection is checked if you want to appear as from the location of your server:
Now, still on your Mac, open a terminal and run
tail -f /var/log/system.logthen click on Connect in the L2TP IPSec VPN connection’s settings. If everything was fine so far you should see something like this:
Feb 16 22:32:50 Vitos-Mac-Pro-3.local configd[17]: SCNC: start, triggered by SystemUIServer, type L2TP, status 0Feb 16 22:32:50 Vitos-Mac-Pro-3.local pppd[87354]: pppd 2.4.2 (Apple version 596.13) started by vito, uid 502

Feb 28 22:32:50 Vitos-Mac-Pro-3.local pppd[87354]: L2TP connecting to server '...' (xxx.xxx.xxx.xxx)...
Feb 28 22:32:50 Vitos-Mac-Pro-3.local pppd[87354]: IPSec connection started
Feb 28 22:32:50 Vitos-Mac-Pro-3.local racoon[378]: Connecting.
Feb 28 22:32:50 Vitos-Mac-Pro-3.local racoon[378]: IPSec Phase1 started (Initiated by me).
Feb 28 22:32:50 Vitos-Mac-Pro-3.local racoon[378]: IKE Packet: transmit success. (Initiator, Main-Mode message 1).
Feb 28 22:32:53 Vitos-Mac-Pro-3.local racoon[378]: IKE Packet: transmit success. (Phase1 Retransmit).
Feb 28 22:33:00 --- last message repeated 2 times ---
Feb 28 22:33:00 Vitos-Mac-Pro-3.local pppd[87354]: IPSec connection failed
Feb 28 22:33:00 Vitos-Mac-Pro-3.local racoon[378]: IPSec disconnecting from server xxx.xxx.xxx.xxx
Don’t worry about the message IP connection failed, that’s because we haven’t configured the authentication on the server yet; the important thing is that the connection is fine (i.e. IPSec connection started). Now, for the authentication, install xl2tpd with
apt-get install xl2tpd ppp
then edit /etc/xl2tpd/xl2tpd.conf and either change the following settings or just remove everything in there and paste what follows:
[global]
ipsec saref = yes

[lns default]
ip range = 10.1.2.2-10.1.2.255
local ip = 10.1.2.1
refuse chap = yes
refuse pap = yes
require authentication = yes
ppp debug = yes
pppoptfile = /etc/ppp/options.xl2tpd
length bit = yes
Next, edit /etc/ppp/options.xl2tpd and paste the following:
require-mschap-v2
ms-dns 8.8.8.8
ms-dns 8.8.4.4
asyncmap 0
auth
crtscts
lock
hide-password
modem
debug
name l2tpd
proxyarp
lcp-echo-interval 30
lcp-echo-failure 4
The last bit of configuration is the file /etc/ppp/chap-secrets which contains the credentials for each VPN account:
# Secrets for authentication using CHAP
# client server secret IP addresses
<username> l2tpd <password> *
Finally, restart the various services involved:
/etc/init.d/xl2tpd restart
/etc/init.d/ipsec restart
/etc/init.d/pppd-dns restart
You should now be able to successfully establish a connection from your Mac client and your IP address, as seen from the Internet, will be that of your L2TP IPSec VPN server.
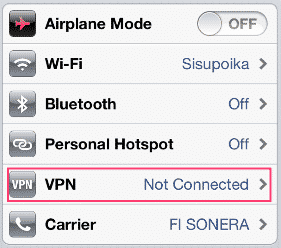
Configuring the VPN client on a mobile device should be very simple in most cases; with the iPhone for example, go to Settings -> VPN:
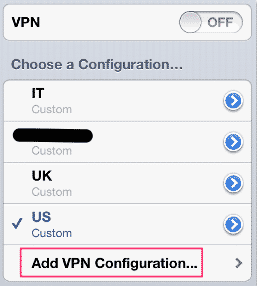
Then add a new VPN configuration:
Then enter the same information you have used on your Mac or anyway other client.
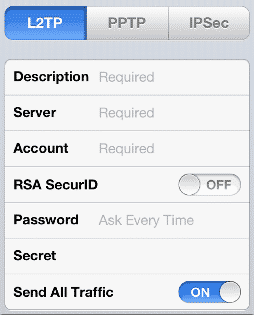
Ensure the Send all traffic is turned on, so to have a more private connection when you are on the move. Finally, go back to the first screen and turn the VPN on. As said in the beginning these instructions have worked for me with several L2TP IPSec VPN servers, but please let me know if they don’t work for you.
 I am passionate about WebDev, DevOps and CyberSecurity. I am based in Espoo, Finland, where I work with the backend team at