FileVault: home directory on an encrypted second drive
 Published
FileVault 2
Using encryption on a laptop gives you peace of mind that if the laptop gets lost or stolen, others won’t be able to snoop inside your precious data. To this end, I’ve been using FileVault for years to encrypt my home directory; so I was glad that the new version introduced with Lion – also known as FileVault 2 – can now also encrypt entire disks, not just the home. So if you are a Mac user you really have no more excuses not to use encryption on your Mac these days.
Unfortunately, while FileVault makes it easy to enable full disk encryption for the main drive, it’s not as straightforward to encrypt other drives. Besides, it is not possible to move a user’s home directory to an encrypted drive other than the main drive. The reason is that FileVault normally “unlocks” only the main disk before a user logs in, while any other disks that are also encrypted will only be unlocked after the user has logged in. This means that the user’s home directory won’t be available during the login process, if stored on a secondary encrypted drive, causing nasty errors.
On my main MBP I’m lucky enough to have two SSD drives installed, so I wanted to leave the first one to the OS, and dedicate the second one to user data, while also having both drives fully encrypted with FileVault.
Here I’ll describe the procedure I followed to achieve this.
Enabling the root user
For starters, I recommend you enable the root user: not only does this make it easier to change the location of your home directory, but it also ensures that if something goes wrong (we’ll see later the most common scenario) you will more likely be able to recover your data or fix your user profile.
You can find easy instructions for this on Apple’s support website.
Encrypting the second drive
I’ll assume here that you’ve already enabled FileVault on the main drive (if not, read this).
Once the root user is enabled, ensure you are logged out ad log in again but as root (from the login window, select ‘other’ and enter ‘root’ as username and whatever password you have set for the root user) and open a terminal. Find the disk you want to encrypt and that will store the home directory with diskutil list:
> diskutil list development [2670cdc] untracked
/dev/disk0
#: TYPE NAME SIZE IDENTIFIER
0: GUID_partition_scheme *240.1 GB disk0
1: EFI 209.7 MB disk0s1
2: Apple_CoreStorage 239.2 GB disk0s2
3: Apple_Boot Recovery HD 650.0 MB disk0s3
/dev/disk1
#: TYPE NAME SIZE IDENTIFIER
0: GUID_partition_scheme *240.1 GB disk1
1: EFI 209.7 MB disk1s1
2: Apple_CoreStorage 239.7 GB disk1s2
3: Apple_Boot Boot OS X 134.2 MB disk1s3
/dev/disk2
#: TYPE NAME SIZE IDENTIFIER
0: Apple_HFS OS *238.9 GB disk2
/dev/disk3
#: TYPE NAME SIZE IDENTIFIER
0: Apple_HFS Data *239.4 GB disk3
In my case I have both drives already encrypted (see Apple_CoreStorage for both drives), but if I hadn’t yet encrypted my second drive, I’d have to run the command
diskutil cs convert /dev/disk1s2 -passphrase
in order to encrypt the partition on my second drive. cs stands for CoreStorage, which is the technology behind FileVault that handles encrypted volumes. The command above will ask for the password you want to use to encrypt the partition – make sure you remember it or keep a note about it somewhere safe, otherwise you won’t be able to access the contents of the encrypted partition later on if you forget it. diskutil will now start encrypting, or “converting” the selected drive, and this will take some time depending on how large the drive is and on how much data is already stored on it.
While diskutil is doing its thing (you can check the status of the conversion at any time with diskutil cs list), open another terminal session and install unlock (big thanks to the author Justin Ridgewell!) – this is required to have a secondary encrypted drive unlocked before logging in:
curl https://raw.github.com/jridgewell/Unlock/master/install.sh | bash
unlock will detect any encrypted drives other than the main one, and for each of them it will ask you if you want to unlock the drive before logging in. If you answer ‘yes’, you will be asked to enter the password required to unlock the drive and that you have set earlier when running the diskutil cs convert command.
Once unlock is installed, you can restart your Mac and then login again as root to proceed with the next step. Don’t worry if the conversion of the disk isn’t complete yet, as it will automatically be resumed once you have restarted.
Moving a user’s home directory
Once you have restarted and are again logged in as root, make a copy (for now) of your home directory to the newly encrypted (or encrypting) drive. For example, in my case the second drive is mounted as “Data”, therefore I copied the contents of my old home directory /Users/vito into /Volumes/Data/Users/vito. I suggest you make a copy rather than just moving your home directory to the new location, so to be able to recover your previous settings if something goes wrong.
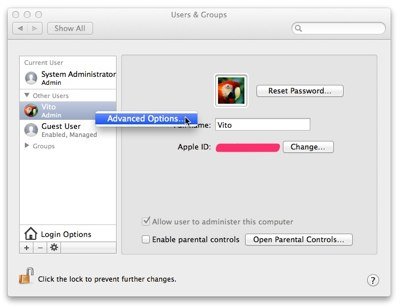
When the copy is complete, open System Preferences -> Users & Groups and click on the lock to authenticate yourself and be able to make changes. Then right-click on the user whose home directory you have migrated, and click on Advanced options:
You’ll see the current location of the home directory:
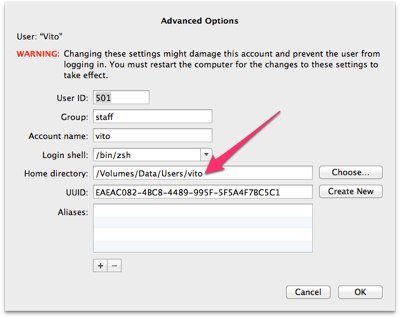
In my case, since I have already migrated it, the current location is already /Volumes/Data/Users/vito. In your case it will likely be /Users/your-username. Click on choose, and select the copy of the home directory in the new location. Done that confirm the selection and log out; then login again with your usual user account, and if all went well you’ll see your usual desktop, dock icons, and all the rest. Just to be sure, open the terminal and type:
> cd ~ ; pwd development [2670cdc] modified untracked
/Volumes/Data/Users/vito
If the change was successful, pwd will return the new location of your home directory. At this point, I’d recommend you restart the system once or twice to confirm that the second drive gets always unlocked before logging in, and that once logged in your user account works fine with the home directory in the new location. I find unlock pretty reliable, but you can never know, so it’s safer to check a few times; once you’re happy that everything works as expected, you should be able to safely delete the original home directory to free that disk space.
If something goes wrong….
From my experience over the past weeks, the procedure I described usually just works. However if for some reason you Mac happens to freeze completely and you can’t shut it down cleanly (it has already happened twice to me since upgrading to Mountain Lion), you could be in trouble. After restarting and logging back in, you might see something like this:
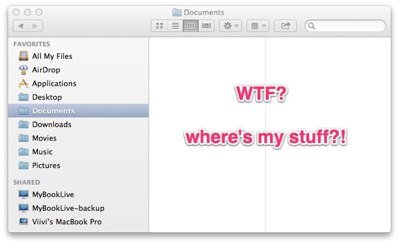
Surprise! It might appear like your stuff is gone. Don’t panic yet – it’s very likely your data is still where it was and in most cases this is quite simple to fix, provided you haven’t disabled the root user! (or have some other admin account available).
If you did disable the root user once encrypted the second drive and moved your home directory across, you will likely end up fiddling with your terminal in a recovery session desperately trying to figure out how to fix your user account, or you’ll otherwise end up restoring from a backup (you do backups, don’t you?).
If you have left the root user enabled as I recommend, fixing should be easy. Log out and login again but as root, and open your terminal. Run the following ls command first to see what’s currently mounted:
Vitos-MacBook-Pro:~ root# ls /Volumes/
Data MobileBackups OS
In my case, I would see a directory named Data since that is the name given to my second drive. If your Mac wasn’t shut down cleanly though, once restarted it could happen that the second drive is not be mounted in that directory. So what happens when you login as your normal user following a forced restart, is that Lion/ML looks for the user directory in /Volumes/Data/Users/vito (or whatever it is in your case) and because it can’t find it, it creates a new home folder in the that location.
Just to confirm, type the following to check the size of your home directory as well as of the mount point for the second drive:
Vitos-MacBook-Pro:~ root# du -hs /Volumes/Data/Users/vito/
7.6M /Volumes/Data/Users/vito/

Vitos-MacBook-Pro:~ root# du -hs /Volumes/Data/
7.6M /Volumes/Data/
You’ll see that both the home directory and the mount point for the encrypted second drive are very small – you might want to check the contests too just to be 100% sure that location doesn’t contain your actual home directory.
So, to fix, you’ll simply need to delete the mount point:
rm -rf /Volumes/Data/
Then log out and log in again with your normal user account. The second drive will be mounted correctly in its usual location, and everything will look normal again.
I like this setup since I like SSDs for obvious performance reasons, but these drive tend to be expensive, so both of my SSDs are kinda small having a capacity of 240GB each. So it’s nice to have OS and apps on one drive, and all the user data on the other one, rather than a full primary drive.
This trick worked really well for me; if you give it a try, please let me know if it does for you too.
 I am passionate about WebDev, DevOps and CyberSecurity. I am based in Espoo, Finland, where I work with the backend team at